Arranging Tips: The Basics (Part 2)
To start off, you’ll need some sort of arranging software (pen and paper is possible but really tedious so… nah). I personally use Musescore cos it’s free ^^
(Note: the screenshots you’re about to see are all based off Musescore 3.0. If it’s outdated by the time you’re reading this, just use whatever the latest version of Musescore is).
===
First up, create a new score and title it whatever you want.

Next up, since you’re arranging for Acapella music, I strongly suggest the following settings.


===
Quick detour: There’s a few reasons why I like to select these parts like this. Simply put, I think PTX got acapella music right.
I could spend a long time talking about why they’re a really great acapella group, but suffice to say that a big reason why they’re excellent is because their arrangements are really well crafted (hats off to you Ben Bram)!
More importantly, can you hear how the parts are grouped together?
In PTX, you essentially only have 4 parts: Bass, Beats, Melody and Harmony. It works. That’s why I select my parts like that.
- Voice = Melody
- Sop Alto Tenor = Harmony
- Bass = Bass
- Beats isn’t reflected on the score, but good arrangers will keep it in mind!
(Of course, in PTX they only have 2 parts in the harmony and not 3. That’s partially because their melody lines rotate and partially because they all have insanely large vocal ranges, unlike most of us normal people).
===
Moving on, quickly select the key and tempo…

… then the time signature. Don’t worry you easily can add/delete bars later on!

===
The next bit is more of a personal preference, but I strongly recommend it too. Look for the mixer…

… and then change the type of instrument that plays.

Suggested settings are:
- Voice: Saw Lead
- Sop/Alto/Tenor: Solo Vox
- Bass: Fretless Bass
I prefer these instruments because it sounds better than the choir aah thing (imo).
You also want to pick instruments where the pitch doesn’t fade over time with long notes (unlike, say, a piano). This will give you a more accurate idea as to whether your arrangement includes some strange sounding clashes. Therefore the baseline instrument is Solo Vox (for the harmony parts).
You want to be easily able to hear the melody (Saw Lead) and the bass (Fretless Bass) when playing your arrangement, as they are distinct parts which should often be doing different musical ideas from your harmony.
Do note that Fretless Bass does still fade a little with time, so if you’re going for really long sustained bass notes you can always use Solo Vox instead and just increase the volume of the bass line.
===
FINALLY time to actually put notes on the score. To me, this is the most efficient way to do it, especially if you’re not really sure exactly how you want your arrangement to sound like yet.
Step 0: Don’t write stuff outside of vocal range
Here’s my personal recommended list of optimum vocal ranges, based on my experiences of singing with my friends (none of us are professional singers; I’m assuming none of yall are either).
(Please go find out what inversions are if you aren’t sure).
- High girls (Sop). Recommended range = C4 to E5
- Low girls (Alto). Recommended range = G3 to A4
- High guys (Tenor). Recommended range = C3 to E4
- Low guys (Bass). Recommended range = F2 to A3
For harmony parts specifically, I like to think of it as C major +/- 2 tones.
- Sop = G4 +/- 2 tones (Eb4 – B4)
- Alto = E4 +/- 2 tones (C4 – G#4)
- Tenor = Middle C (C4) +/- 2 tones (Ab3 – E4)
Of course, if you know your group has a different vocal range from this, by all means stick to that instead!
===
Step 1: Bass Line


Copy paste this as needed.
Notice the bass line is the root note of the relevant chord. This should usually be the case (it can be switched around in more advanced arrangements, but that’s for another time).
===
Step 2: Melody Line


And continue until you hit a part which involves harmony parts.
===
Step 3: Add harmony lines

First up, you just need add the chords where they’re required, unless you have specific ideas for fancy rhythms.
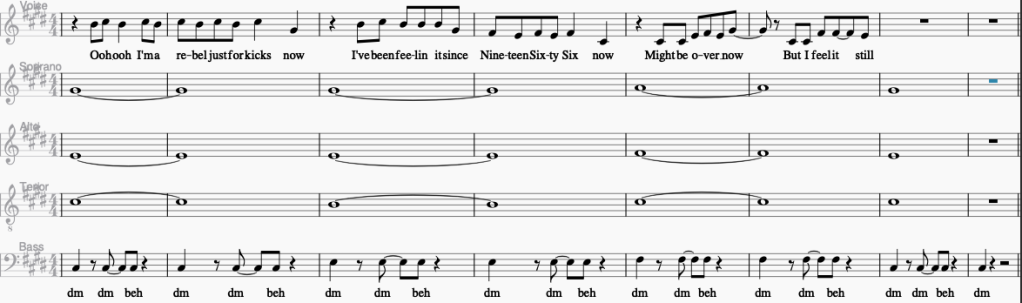
Notice that collectively the SAT lines form the relevant chords. From bottom to top:

- First 2 bars: C# E G# = C#m (root position)
- Next 2 bars: B E G# = E (2nd inversion)
- Next 2 bars: C# F# A = F#m (2nd inversion)
- Last 2 bars: C# E G# = C#m (root position)
There’s a few reasons why the chords are inverted like that. The most straightforward explanation is that this keeps the SAT parts within optimum vocal range.
Importantly, I want to draw your attention to the tenor line. Notice that the treble clef has a little 8 below it. What this means is that all the notes written in it are actually an octave lower than a normal treble clef.

So you do have to be careful when you write stuff into the tenor line.
===
And with those three steps (plus adding lyrics for the harmony lines), we can arrange our way through any song!
Quick tldr:
- Find correct chords
- Create musescore file
- Input music
- Add bass line
- Add melody line
- Add harmony lines
===
Congratulations you are now an acapella arranger :b
But it kinda sounds a bit boring right 😦
That’s because we’ve only learnt the absolute minimum to get a functional arrangement.
That’s it for this post, but if you want to learn to make things a teeny bit more interesting, head over to part 3!
~Andrew
